Growing Your own
mushrooms is super easy!
WITH OUR GOURMET MUSHROOM GROW KITS !!!
Find the variety that fits you best!
A wide variety of specialty mushrooms right on your countertop.
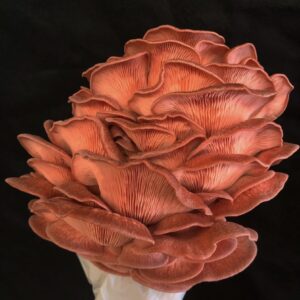
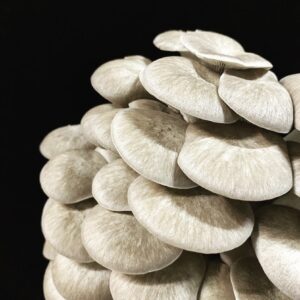
- Pink
OysterIncubation: 2-3 weeks
Fruiting: ~6 days
A unique beauty, this pink floret
shaped mushroom is impossible to
find in stores due it’s short shelf life.
It has been used as a bacon alternative
as it takes on a sweet, pork like flavor
when cooked. It also makes an
amazing jerky as it has the firmest
texture of all Oyster mushrooms.
Growth Notes:
Quick grower.
Extremely resistant to contamination.
Tolerates warmer temperatures.
Produces 3+ separate harvests.
Skill Level : Very Beginner Friendly
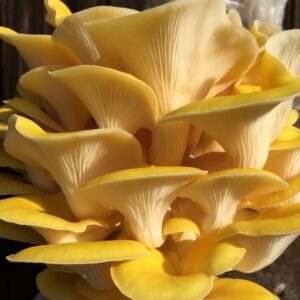
- Golden
OysterIncubation: 2-3 weeks
Fruiting: 6-10 days
Small, delicate and FLAVORFUL!
Again, you wont find this one in
stores because of how brittle it is.
The softest of the Oyster variety, this
tasty mushroom has flavor tones
similar to cashews. It has small caps
that are great for stirfys and soups.
Growth Notes:
Moderately tolerant to dry conditions.
Lower harvest weights.
Requires high levels fresh air.
Produces 2+ separate harvests.
Produces high levels of spores.
Skill Level : Beginner Friendly
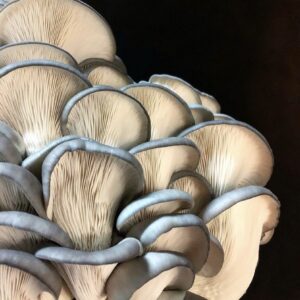
- Baby Blue
OysterIncubation: 2-3 weeks
Fruiting: ~9 days
Known for it’s gray-blue color this
mushroom has thick, large and
meaty caps and keeps it’s shape well
when cooked in a variety of methods.
This mushroom has become popular
for making a great vegan fried
“chicken” or Steak.
Growth Notes:
Highly susceptible to contamination.
Very high harvest weights.
Produces 2+ separate harvests.
Produces high levels of spores.
Skill Level : Beginner Friendly

- Lion's
ManeIncubation: 2 weeks
Fruiting: ~12 days
This brain boosting DELICIOUS
superfood is becoming one of
the most sought after mushrooms
in the world! When cooked it
develops a sweet delicate flavor
that has been compared
to crab or lobster. A must try!
Growth Notes:
Moderatly resistant to contamination.
Intolerant of very dry conditions.
Avoid direct airflow and misting.
Requires high levels of fresh air.
Often difficult to grow “teeth”.
Harvest before yellowing.
Produces 3+ separate harvests.
Skill Level : Intermediate
- Black
Pearl KingIncubation: 3 weeks
Fruiting: ~15 days
A rare alternative to the traditional
King Oyster, it is a stalky mushroom
known for it’s meaty texture and
delicate flavor. It holds it’s shape
well when cooked and is similar to
sea scallops in texture. Use where
you would use King Oysters.
Growth Notes:
Produces a wide range of physical expressions.
(From small clusters to 1 large mushroom)
Requires temps under 68 deg F to initiate fruiting.
Moderate harvest weights.
Moderately resistant to contamination.
Diificult to produce more than 1 harvest.
Skill Level : Intermediate
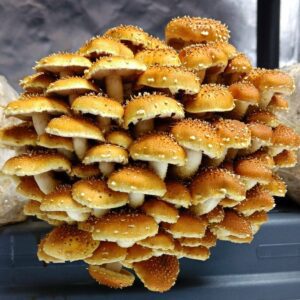
- Pretzel CapIncubation: 6 weeks
Fruiting: ~2 weeks
This mushroom is unique in that
after cooking, it still retains its
shape and a bit of a snap, similar to
that of asparagus. With an earthy
and nutty flavor and its interesting
appearance, its one of our
favorites.
Growth Notes:
Moderately susceptible to contamination.
High harvest weights.
Tolerant to dry conditions after initial fruiting.
Harvest right when veil breaks.
Produces high levels of spores.
Diificult to produce more than 1 harvest.
Skill Level : Intermediate
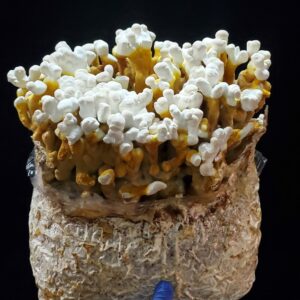
- ReishiIncubation: 3 weeks
Fruiting: 6-8 weeks
The mushroom of immortality!
Also known as Lingzhi, this medicinal mushroom has been used for 1000’s of years and is researched for immune health
and anti-cancer properties.
Too tough to eat directly, this mushroom is used to make teas, tinctures and even broths.
Growth Notes:
Grows entirely in the bag- No need to mist.
Grows towards the light!
Small harvest weights.
Moderately resistant to contamination.
Diificult to produce more than 1 harvest.
Skill Level : Set it and Forget it!
How does it work?
(This is just an overview, be sure to read the instructions below)
Substrate production
First we prepare an exact mixture of water, wood and agricultral left overs (like organic soy bean hulls, alfalfa or wheat bran) … this mixture is known as mushroom substrate”.
This is all the food that the mushrooms will need.
We bag it in a biodegradable breathable bag and steam it for 24 hours to eliminate competing fungi and bacteria.
We produce the largest substrate bags on the market for our grow kits at 10 lbs!
This mean more Mushrooms for you!
( 1-4 lb of fresh mushrooms in ideal conditions over multiple harvests, species dependant)
Clean room Inoculation
After the substrate bags cool down they are brought into our laboratory where they are innoculated with carefully controlled cultures of pure mushroom mycelium.
This must be done under a hepa filtered laminar flow hood as a single spore of mold can contaminate the entire bag,
Incubation
The bags are then placed in our incubation room where they are monitored for signs of contamination and allowed to colonize and digest the substrate.
Depending on the species they will incubate anywhere from 10 days to 12 weeks before they are ready to start producing mushrooms.
You will recieve your substrate bag sometime before this incubation time is complete. Take the bag out of the box and watch the mycelium grow! The grow kit includes a spray bottle and a biodegradable plastic sheet to fashion a humidity tent.
Pinning
The mycelium is now ready to begin producing mushrooms!
But it will need a trigger to start producing baby mushrooms (aka “pinning”).
The triggers are species dependant but are usually a combination of:
– Running out of food
– Increased fresh air
– Colder temperatures
– Increased moisture
– Physical shock
-Increased light
We will emulate these triggers by cutting open the bag when fully colonized, exposing it to fresh air and misting multiple times a day to increase humidity.
For Black Pearl Kings, it might be helpful to place in the fridge for a couple of days after cutting open the bag.
Fruiting and Harvest
The mushrooms will grow quickly and will form properly if given enough fresh air and humidity.
A lack of fresh air will cause deformed mushrooms with stems too long and tough.
Finally its time to harvest!
Mushrooms rapidly deteriorate after they release their spores, which is why it is best to harvest before they do so.
For Oysters, harvest before the edges of the caps flip upwards.
For Lion’s Mane, harvest before the teeth become too long or before it becomes yellow and soft.
For Chestnut, harvest soon after the veil underneath the cap separates and the gills are visible.
Remember to cook all mushroms before you eat them!
GROW KIT DETAILED INSTRUCTIONS!
So you got a grow kit, now what?
YOU MUST READ THIS CAREFULLY!!!
Your Grow Kit comes with a Recommended Bag Cut Date. It can be any where from a few days ago to 6 weeks in the future.
Before this date, all you have to do is sit the bag upright inside of the box with the white filter patch up so that it can breathe and watch the mycelium colonize the bag, also watch for signs of contamination like green mold.
During this time it will be normal to observe some yellow / orange liquids (aka metabolites). They are just the byproducts of digestion. However, excessive amounts could mean a different type of contamination. If you have any questions, feel free to reach out to us.
If your substrate bag is contaminated at this point we will be happy to replace it for you,
Occasionaly your grow kit will not be ready by the recommended bag cut date. You will be able to tell if this is the case because a significant portion of the substrate is not yet colonized and there are no blobs yet. If this is the case then just wait a few more days. (Please note that partial colonization (90%) is normal for Pink Oyster and Lion’s Mane, no need to wait a few extra days for these)
Occasionaly your grow kit will be ready before your recommended bag cut day. You will be able to tell if this is the case because your bag will start forming little blobs, (mushroom babies). If this so, just skip ahead.
Its your recommended bag cut day (or close to it) and its time to trigger the growth of baby mushrooms! (pins)
First lets put the grow kit somewhere between 65 – 75 deg F avoiding direct sunlight and away from direct air flow. A kitchen counter is usually suitable.
Lay the grow bag back in the box and with a clean knife cut the bag along the mark on the bag (Either an X or a slit). Its ok to cut a little into the actual substrate.
Fill up the spray bottle with clean water and spray the area where you cut as well as the entire inside of the box. Its important to maintain near 100% relative humidity during this time to encourage the formation of baby mushrooms.
If you have a home humidifier, place it near by.
If you are in a dry climate, use the provided biodegradable bag to create a humidity tent,
You can flip the box flaps up and place the bag over it to increase humidity. HOWEVER, be sure to poke ALOT of holes in it for proper ventilation.
Keep misting 5+ times a day for 2-5 days until you see baby mushroom blobs begin to form.
Once the baby mushrooms are about 1/2 inch tall, do not spray them directly anymore. Instead, spray around them. But still 5+ times a day.
The goal is to maintain 75 -95 % relative humidity until it is time to harvest.
Once the mushrooms are 1 inch tall, you can remove the humidity tent and lower the box flaps a little to promote more fresh air exchange.
If you notice that the mushrooms start growing long stems, try to increase fresh air while still maintaining high humidity.
Watch your mushroom grow! They may double in size every day! Pay attention to the Fruiting time listed for each variety in the sections above.
Finally its time to harvest!
Mushrooms rapidly deteriorate after they release their spores, which is why it is best to harvest before they do so.
Spores are also a mild to severe respiratory irritant so, please be mindful.
For Oysters, harvest before the edges of the caps flip upwards.
For Lion’s Mane, harvest before the teeth become too long or before it becomes yellow and soft.
For Chestnut, harvest soon after the veil underneath the cap separates and the gills are visible.
You can harvest by grabbing the mushroom cluster close to its base and either snapping it or twisting it off!
Remember to cook all mushroms before you eat them!
You can get more than one harvest from your block!
However, each subsequent harvest will yield less mushrooms and is more likely to become contaminated.
To do this, start by plucking off all remaining pieces of old mushroom and taping over the cut plastic. Flip the block over to a new uncut spot, wait 5 days and repeat the pinning and fruiting process.
It might take a few days longer the 2nd time so be patient!
You can keep doing this until the substrate bag contaminates with green mold or produces no more mushrooms.
The usefulness of your mushroom substrate block isnt over yet!
Remove the bag, break up the block and add it to your garden.
“Spent Mushroom Substrate” is known as an EXCELLENT compost and soil amendment. It can really help your garden grow!
You can also bury the block whole and your garden might even sprout some extra mushrooms!
Messaging us on instagram is the best way to get ahold of us.
@Desert_Moon_Mushrooms
Otherwise email us!
Support@DesertMoonFarms.com
We truly want you to be satisfied with your grow kit. If you have problems, please don’t keep quiet, we will gladly replace your grow kit if you fail to get at least one decent harvest.
Our Grow Kit Guarentee!
Scared of trying? Dont be! We got your back!
There is a small chance your grow kit was doomed from birth. Likely due to some sort of contamination.
Unfortunately, such things happen. If this is the case, we will gladly replace your grow kit.
Otherwise:
IF the intructions are followed we guarantee you will harvest at least 1/2 lb of mushrooms over the course of your grow kit's life.
If you don't, we will gladly replace your first grow kit .
We may refuse to replace your grow kit if:
-The grow kit was left in the box for more than 30 days before opening.
-The bag was sliced open too early or too late.
-The grow kit was not misted at least 3 times a day EVERYDAY.
-The grow kit was placed in an inappropriate environment.
-The grow kit's skill level was rated Advanced.
-Any other instructions were not followed
Desert Moon Farms
Las Vegas Grown Gourmet Mushrooms!
ABOUT
We are a curious, eco-conscious local couple with a goal to offer Las Vegas fresh gourmet mushrooms. Bye-bye boring button mushrooms!
702 575 5738
702 540 7741
LOCATIONS
Our Farm is located at
115 E. Reno Ave, Unit 8,9,10
Las Vegas, NV, 89119
Near Tropicana and Las Vegas Blvd
Navigate to Desert Moon Mushrooms!
Appointments Only! Please Call ahead!